
What is Apache Airflow? An Overview

Workflow management platforms are what data engineers use to schedule and coordinate the steps in a data pipeline – an activity sometimes referred to as “data orchestration”. Apache Airflow is one of the most popular such platforms, and is open-source as well. Created by Maxime Beauchemin at Airbnb in 2014, it joined the Apache Software Foundation’s Incubator program in March 2016 and has taken off since. This post describes the fundamentals of Airflow, how to install it, and how to build and run your first DAG.
Directed Acyclic Graphs (DAGs)
Airflow represents the flow and dependencies of tasks in a data pipeline as a graph. Not only a graph, but one with some constraints.
The graph is directed, meaning it starts with a task or multiple tasks and ends with a specific task or tasks. This is required to guarantee a path of execution. This way, the graph ensures that tasks do not run before all their dependent tasks are completed.
Graphs must also be acyclic, meaning that a task cannot point back to a previously completed task. In other words, it cannot cycle back. Without this constraint, a graph could run in an endless loop.
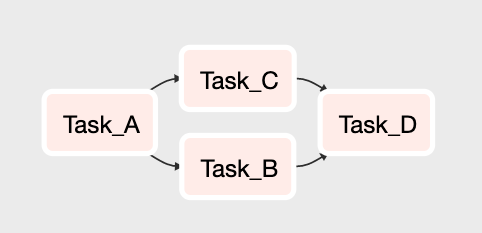
Here’s a simple DAG. In this example, Task A must complete before Tasks B and C can start. Once both are completed then Task D can start. Once Task D is complete, the graph is completed as well.
Airflow Components and Concepts
In addition to DAGs, there are a number of components and concepts in Airflow that you’ll need to know before you get started.
Tasks – As noted in the previous section, a DAG is made up of Tasks. Each node in the graph is a Task, and each Task implements an Airflow Operator.
Operators – Operators are what actually execute scripts, commands, and other operations when a Task is run. There a number of operators that ship with Airflow, as well as countless custom ones created by the Airflow community. You can of course make your own as well. Here are some of the most common operators.
- BashOperator
- PythonOperator
- SimpleHttpOperator
- EmailOperator
- MySqlOperator, PostgresOperator, and other database specific operators for executing SQL commands
- Sensor
The Airflow Database – Airflow requires a database to store all the metadata related to the execution history of each task and DAG, DAG schedules, and more. By default, Airflow uses a SQLite database but you can point it to a MySQL, Postgres or any other number of databases. In fact, if you want to use Airflow for anything beyond learning I suggest you set up a MySQL or Postgres database and point Airflow at it (see “Setting Up Airflow”).
The Airflow Scheduler – The Scheduler is constantly monitoring DAGs and tasks and running any that have have been scheduled to run or have had their dependencies met.
Airflow Executers – Executors are what Airflow uses to run tasks that the Scheduler determines are ready to run. By default, Airflow uses the SequentialExecutor, but at scale you’ll like use something like the CeleryExecutor, DaskExecutor, or KubernetesExecutor to run tasks in parallel.
Airflow Web Server – Airflow comes with a web app (built in Flask), that has a friendly UI for managing your Airflow instance, viewing DAG runs, and more.
Setting up Airflow
If you’re familiar with Python, setting up Airflow is quite simple.
If you’re using a Mac or Linux environment, it’s best to first define where Airflow will reside.
$ export AIRFLOW_HOME=~/airflow
If you’re just looking to try Airflow out, you can install it via pip as follows.
$ pip install apache-airflow
For more advanced installation instructions, or if you run into problems, the Apache Airflow documentation site has an excellent reference on installation.
Next you’ll need to initialize the Airflow database. As noted in the prior section, Airflow uses a SQLite database by default. The following will initialize that database, but you can change it later.
$ airflow initdb
Next, start up that fancy Airflow web server.
$ airflow webserver -p 8080
And finally, start he Airflow Scheduler.
$ airflow scheduler
When you visit http://localhost:8080 in your web browser, you should see the Airflow Web UI. If you’re having any trouble, refer to the “Where to Learn More” section at the end of this post.
Building a Simple DAG
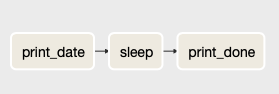
Airflow DAGs are defined in a Python script, where the DAGs’ structure and task dependencies are written in Python code. Below is the definition of a simple DAG with three tasks. Each task in the DAG is defined as a BashOperator, with the first and third printing out some text and the second sleeping for 3 seconds. It doesn’t get much simpler than this, but it’s a fully functional DAG!
from datetime import timedelta
from airflow import DAG
from airflow.operators.bash_operator import BashOperator
from airflow.utils.dates import days_ago

dag = DAG(
'example_dag',
description='An example DAG',
schedule_interval=timedelta(days=1),
start_date = days_ago(1),
)

task_1 = BashOperator(
task_id='print_date',
bash_command='date',
dag=dag,
)

task_2 = BashOperator(
task_id='sleep',
depends_on_past=True,
bash_command='sleep 3',
dag=dag,
)

task_3 = BashOperator(
task_id='print_done',
start_date = days_ago(1),
depends_on_past=True,
bash_command='echo \'done\'',
dag=dag,
)

task_1 >> task_2
task_2 >> task_3
In order to run the DAG, you’ll need to save it’s definition file (name it something like example_dag.py) to the location where Airflow is looking for DAGs. You can find this location (or modify it) in the airflow.cfg file which resides in the directory that you installed Airflow in. It will look something like this by default. You may need to restart the Airflow web app and/or scheduler for the DAG to show up in the Web UI.
dags_folder = /Users/myuser/airflow/dags
Note that when the “dag” object is instantiated in the code, it’s given a schedule to run once a day at midnight (UTC by default) starting on the previous day. That means that when you first activate the DAG it will start running right away because it’s “overdue” for its last run. You can learn more about scheduling DAGs in the official Airflow docs.
The last two lines of the script define the dependencies of the tasks in the DAG. When you view the DAG in the Airflow Web UI, you’ll see the following Graph View of the it.
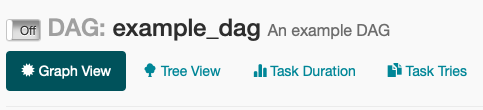
When you’re ready to run the DAG, just enable it by sliding the toggle switch on the top left-hand side of the screen when you’re on the DAG’s detail page in the Web UI. As you can see below, the DAG is “off” by default. Recall from above that the DAG will start as soon as you enable it (assuming an Executor is available) due to it’s schedule.
You can check on the status of a DAG run on the DAG detail page your already on, or by navigating to “Browse→DAG Runs” on the top menu.
Where to Learn More
That’s it for a quick rundown of what Airflow is, how to install it, and how to build your first DAG. There’s much more to Airflow of course! Here are a few links to official Airflow documentation and other resources for learning more.
Go through the official Airflow Tutorial.
Learn more about scheduling DAGs.
I wrote about using Airflow, including more advanced DAG design, in my book, Data Pipelines Pocket Reference.
This is an excellent introduction to Airflow from PyData SF 2016 by Matt Davis.
A detailed, hands-on walkthrough of Airflow from PyData Berlin 2019 by Varya Karpenko.